This is the second part of a series of howtos showing one way to set up and use Samba4 as a drop in for MS Active Directory Server. The first part Samba4 AD DC on Ubuntu 14.04 is here
Let’s start by adding a small change to the Samba configuration on the AD, lab-addc1. Edit /etc/samba/smb.conf adding the following lines to the [globals] section.
sudo nano /etc/samba/smb.conf
        idmap config *:backend = tdb
        # This local range must not overlap the BLACK:range above
        idmap config *:range = 5000-9999
        idmap config BLACK:backend = ad
        idmap config BLACK:schema_mode = rfc2307
        idmap config BLACK:range = 10000-29999

        # Use home directory and shell information from AD
        winbind nss info = rfc2307
If you are going to be connecting via to your AD DC with Linux machines, we also need to set the initial starting values for the Linux UID and GIDs.
sudo ldbedit -H /var/lib/samba/private/sam.ldb -e nano \
      -b CN=black,CN=ypservers,CN=ypServ30,CN=RpcServices,CN=System,DC=black,DC=dragon,DC=lab
This will open nano with the current settings. Insert the two lines at the end of the file. I have used 10000 as the starting point for UIDs and 20000 for GIDs this was purely arbitrary you can use pretty much any ranges here. If you change them make sure you also change the values in smb.conf for the BLACK range.
msSFU30MaxUidNumber: 10000
msSFU30MaxGidNumber: 20000
Load the changes into Samba.
sudo smbcontrol all reload-config
Before starting with Windows, log into you Samba 4 AD DC as we need to allocate the SeDiskOperatorPrivilege privilege for the builtin Domain Administrators group. This will allow the ‘BLACK\Domain Admins’ group to configure the share permissions via the Windows tools.
First let’s have a look at the privileges that user already has and the complete absence of the Domain Admins group.
sudo net rpc rights list accounts -Uadministrator
And to set the privileges:
sudo net rpc rights grant 'BLACK\Domain Admins' SeDiskOperatorPrivilege -Uadministrator
Using Windows, sorry
I’m assuming you have access to Windows 7 or later otherwise why on earth would you be doing all this! 🙂 Login to your Windows 7 machine as the local Administrator.
For Windows 7 you need to download and install an update, you can get it from here. The file I downloaded was called Windows6.1-KB958830-x64-RefreshPkg.msu. For other versions of Windows try searching for Remote Server Administration Tools or RSAT.
During the install you are asked to if you want to install it, *boggle* and then you have to accept the terms of installing a virus this patch on your PC. The installation, initialisation, configuring, rebooting, more configuring takes a long time, almost as long as installing a complete desktop Ubuntu 14.04, so I went off, made and ate lunch.
Back to Windows 7, read and follow the installation instructions. Once done reboot a couple of times as is traditional with MS Windows.
Configure Tools and Snap-ins
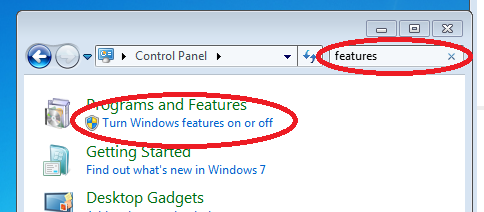
Navigate to Control Panel, Using the search box look for features, and then click on the link Turn Windows features on and off. This takes an age to load, time for a coffee?
In the next dialog, you need to scroll down to Remote Server Administration Tools. Expand the tree and select the services you want to administer. I use the ones ticked as a minimum. After clicking Okay, you have time to make a coffee as it takes ages to do what ever its doing :-(.

Add Windows to Samba4 Domain
Adding your Windows PC to a Samba 4 domain is the same as adding it to a SBS 2003 or 2008 Domain.
For Windows 7: Press and hold the [flag] then tab [Pause/Break].
In the resulting dialog click the link Change Settings.
In the next dialog, this time you click a button Change…
In this dialog, click the radio button for Member of Domain, and type in your domain name. In my case it is BLACK.DRAGON.LAB, so enter that and wait for another dailog to popup. This one is asking for a user on the domain who has permission to add computers to the domain.
User name: Administrator
Password:  Admin1234
Click okay to remove two dialogs then close and then reboot. It’s Windows of course you have to reboot 🙂
After the reboot, login as BLACK\Administrator.
Add and Configure Groups
The installation of the Microsoft tools does not always add the necessary folder links to the Start menu, it is Windows after all. Click the start button and search for computer. This gives two links Active Directory Users and Computers along with Computer Management. Right click each entry -> pin to start menu. Repeat the process searching for group and then pin Group Policy Management to the start menu.
Start up Active Directory Users and Computers. In the main menu -> select Advanced features, they come in handy.
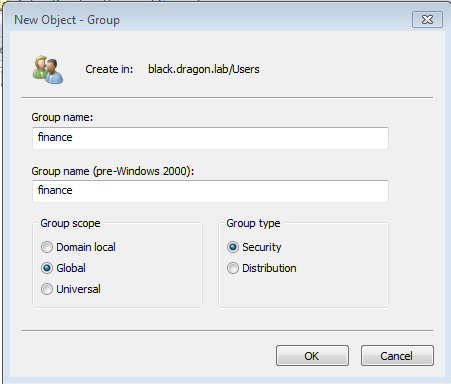
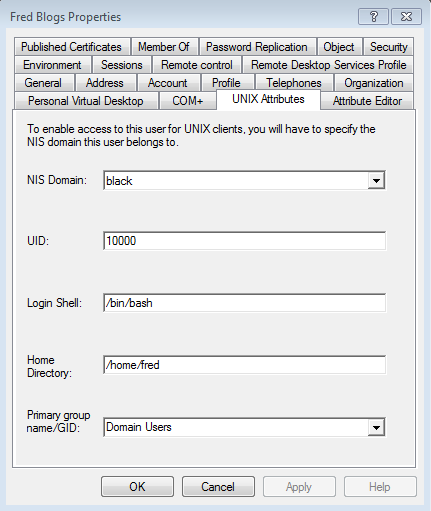
Groups are configured in the Users container *boggle*. Right click on Users and select New -> Group. Enter the group names you will be using. For now I will configure just the finance group.
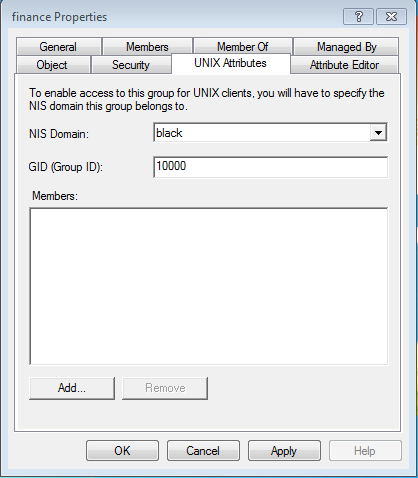
Now find the new finance group in the Users container, right click, and select properties. This opens up a multi-tabbed dialog.

Add a description as you feel fit. Then open the UNIX tab, select your domain from the pull down and accept the GID unless you want a different value. Click okay to save the changes and close the dialog.
Next we need to add UNIX GID’s to at least the groups for Domain Users, Domain Admins and from the builtin folder Administrators which should already exist. Use the same method as above.
Adding Test Users
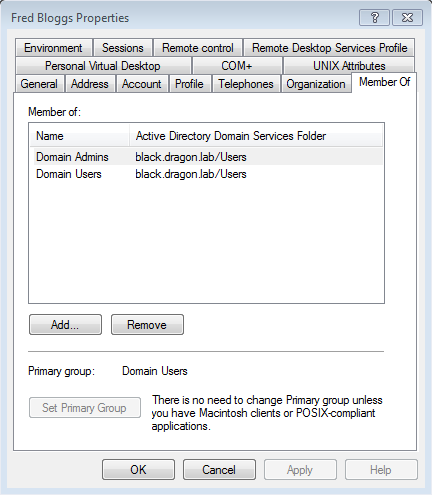
Let’s create some users. I like to test with three users as shown below. All three users, have Domain Users as their default group.
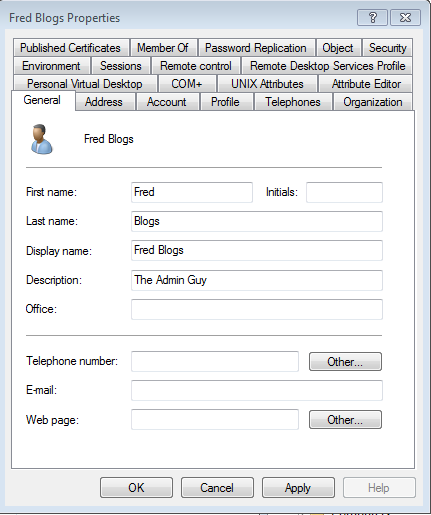
- Real name: Fred Blogs
- User name: fred
- Member Of: Domain Users, Domain Admins
- Real name: Mary Money
- User name: mary
- Member Of: Domain Users, finance
- Real name: Bert Worker
- User name: bert
- Member Of: Domain Users
These users are created using a similar process to groups. Right click on the Users container selecting New -> User. Another multi-tabbed dialog opens.
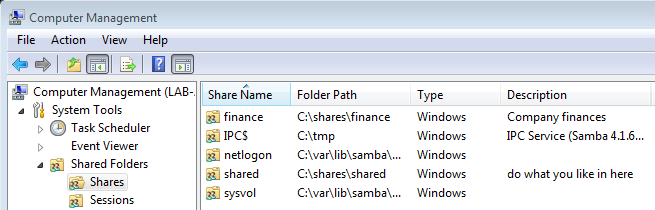
Adding File Shares
To add a new share located on lab-addc1, our AD DC. Login to lab-addc1 then run the following commands which create the directories where the shares will have their top level directory.
sudo mkdir -p /shares/shared /shares/finance

sudo nano /etc/samba/smb.conf
Add the following to the end of your /etc/samba/smb.conf file.
[shared]
     comment = do what you like in here
     path = /shares/shared
     read only = no

[finance]
     comment = Company finances
     path = /shares/finance
     read only = no
Load the changes into Samba.
sudo smbcontrol all reload-config
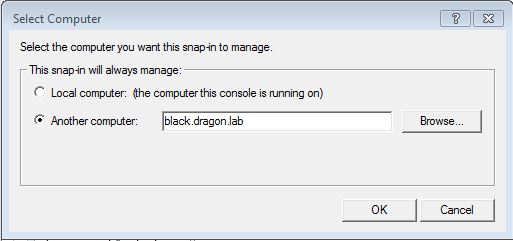
Back to Windows, Open Computer Management. Once it is loaded, from the main menu -> Action -> Connect to another computer… This is lab-addc1.black.dragon.lab. You can also use the browse option which allows you to search using a partial server name name, so not really a browse. Anyway, right click shares and select add New.
Now open the shares container, right click on each of our shares in turn adding Share Permissions to each.
- finance: Domain Admins and finance (BLACK\finance)
- shared: Everyone, Domain Admins

Also update the setting in the security tab.
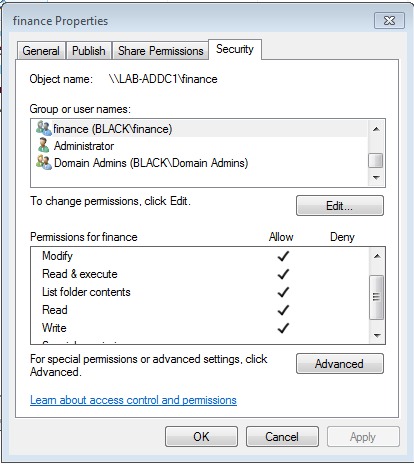
Make sure you restrict the Share Permissions to the groups who should have access. Admins only, that would be, er um, only the Admins :-). For the finance share allow admins and finance. For shared, everyone has access, it’s a free for all in there.
Testing those Permissions
For each of our three users login to a Windows machines and a Linux machine. Try to access each of the shares in turn.
Fred should be able to access both shares. Mary can also access Finance and shared, while Bert can only access shared.
When you get access to a share for a user, create a file using their name and then add some text. e.g. Mary was here.
For each user also try and add extra text to existing files, e.g. To the files Mary creates in finance, get Fred to add ‘Fred got here too!’
For the next part in this series take a look at Joining an Ubuntu Machine to Samba with Winbind..
Hi,
first of all I want to thank you for this great tutorial. It helped me a lot installing and configuring a domain controller with a working active directory.
If I want to manage the share permissions on windows 7 I got the problem that the ‘Security’ tab is not visible at my system (e.g your picture of the window ‘finance properties’).
I only get the three tabs ‘General’, ‘Publish’ and ‘Share Permissions’ and thatswhy I cannot set the correct rights for all my users and groups.
Do you have an idea why this ‘Security’ tab is missing?
I configured everything like you described in your tutorial, except the name of the domain.
Could you please help me?!
Thanks, Daniel
Hi,
I found the reason of the missing Security Tab at Windows 7. Maybe Its a little mistake in your tutorial.
When you set the user privileges of the samba admin you do that for the BUILTIN domain:
sudo net rpc rights grant 'BUILTIN\Administrators' SeDiskOperatorPrivilege -UadministratorI tried out to set the user privileges for my domain name:
sudo net rpc rights grant 'MYDOMAINNAME\Administrators' SeDiskOperatorPrivilege -UadministratorNow it works fine for me. Thank you for your great tutorial.
Regards, Daniel
I am glad you worked it out and thanks for the update. I’ll update the post.
Many thanks for this great series of tutorials! I’d suggest one simplification: there is no need to set both the Share Permissions (on the Share Permissions tab) and the NTFS permissions (on the, ah, Security[1] tab). According to “Share and NTFS Permissions on a File Server”[2], the most restricted permissions apply, so the simplest approach is to leave one of the two wide open and use the other to define access. That document seems to suggest that setting NTFS permissions is the preferred way, since these apply regardless of whether the file is accessed locally or remotely, whereas share permissions apply only to remote access to an object. In the case of a Samba share (where there is no local access) it might make no difference, or even more sense to use Share permissions instead. I don’t know.
Cheers,
Zwets
[1] The “Security” tab should’ve obviously been called “NTFS Permissions”, but I reckon that Microsoft rejected the idea for lack of confusingness.
[2] Located in the Windows Help for Access Control. You’ll find this by clicking on “Learn about access control and permissions” in the properties dialog, then opening “Managing Permissions”, then “Share and NTFS Permissions on a File Server”.
I do not use Windows unless i have too, it’s too painful and the majority of the time the problems are put there by MS purposely obstructing any interconnection between system only to raise more money. I have never seen this problem and can only assume it’s a Windows permissions problem.
I agree with your comments about MS and their naming conventions and that that they change terminology to make MS look like it it doing stuff all other Operating systems already “just do without fuss”.