While sorting out this HOWTO and learning how to setup Zentyal I used my Network lab, See how to set up your own. If you do use this then remember to turn of the DHCP server in the router if you intend to use the DHCP server within the Zentyal server.
When setting up Zentyal we want it to be the gateway or at least get all the internet traffic to flow through it. See the diagram below. This is using my VirtualBox test-lab. We are only interested in the part inside the broken lines.
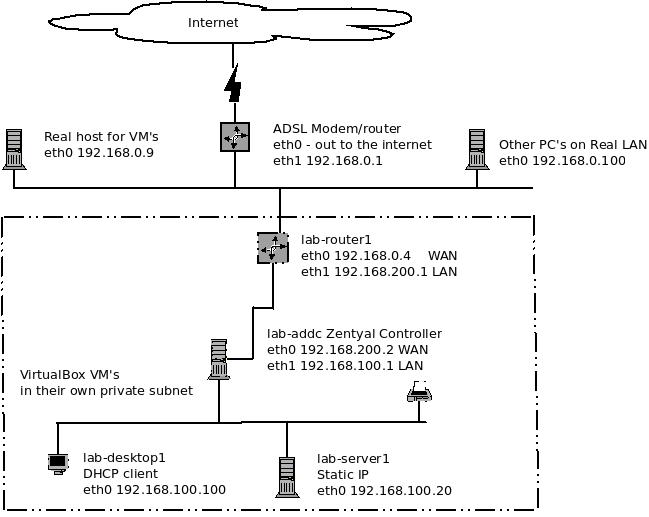
We will need a machine with two NIC’s one to point at the router and the other to point at your local domain. All internet traffic to and from the internet will then flow through your Zentyal server and its firewall and monitoring software.
Install a minimal Ubuntu Server 12.04 LTS. If you need help with this take a look at my post
Ubuntu minimal Install with MATE as the Desktop
If you have not already done so install the VirtualBox Guest Additions, which will help with performance and add some useful functionality. If you needed to install the additions reboot before going on.
We will need to install gvfs-backends or you will not be able to talk to smb shares with “smb://server/sharename” from caja. It can be installed with:
sudo apt-get install gvfs-backends
Add the zentyal repos to your /etc/apt/sources.list:
sudo deb https://archive.zentyal.org/zentyal 3.3 main extra
wget -q https://keys.zentyal.org/zentyal-3.3-archive.asc -O- | sudo apt-key add -
Now we can install the Zentyal specific modules. The first install line assumes you already have a GUI or X running on your server, that is you followed the link to install a minimal server and then added MATE to it. The second line below, will install the minimal Zentyal GUI, note this appears to be locked with a screen resolution of 800×480. WHY?!? When it’s actually too small to display the Zentyal Amdin web pages effectively.
sudo apt-get install zentyal
      OR
sudo apt-get install zenbuntu-desktop
The steps above for adding repos and installing Zentyal are detailed in the Zentyal Installation Guide.
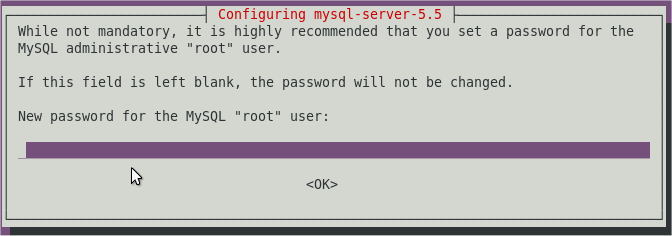
I will assume you are installing the first. During the installation you will be asked for the root MySQL password. Enter it then enter it again as is customary for passwords.
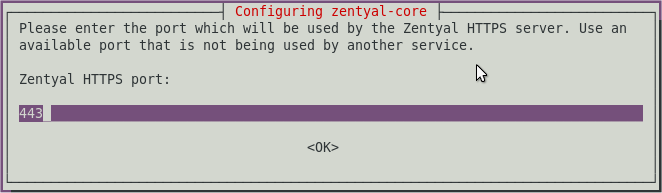
You will also be prompted for the port that is used for the Zentyal portal. Change this to port 444 or any unused port. This port needs to be changed especially if you plan on using SSL/HTTPS connections later with the web service.
Make sure the hostname file is set to only the name and not the fully qualified name.
sudo nano /etc/hostname
sudo reboot
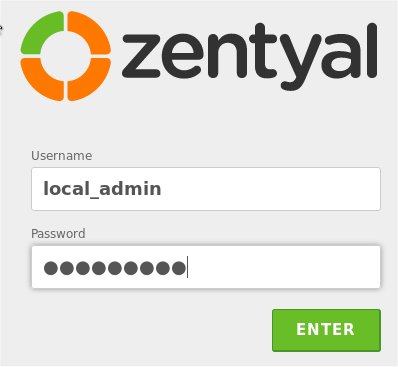
Once you are rebooted and logged in. Open up firefox, my favourite browser, and log in to the Zentyal Admin Portal at
https://localhost:444 to start the install and initial configuration process.
The user name and password are the for the user you created during the Ubuntu Server installation or any other user that is in the sudo group.
Select the packages you require and click install. I normally start off with Certificate Authority, DHCP Service, DNS Service File Sharing and Domain Services, Firewall, NTP Service, Network Configuration, Users and Computers.
When that is all working I add these extra modules:
Anti-virus, Backup, Bandwidth Monitor, Groupware, Jabber, Mail Service, Mail Filter, Monitor, Web Service.
Once the initial configuration wizard starts up. We can configure the two NIC’s. One for external, that is pointing to the internet. The other pointing to our LAN or internet. A point to note is that once a NIC is configured to be external you cannot connect to the Zentyal web portal through it. This is for security reasons. If you connected to Zentyal via an external NIC the web browser will stop working.
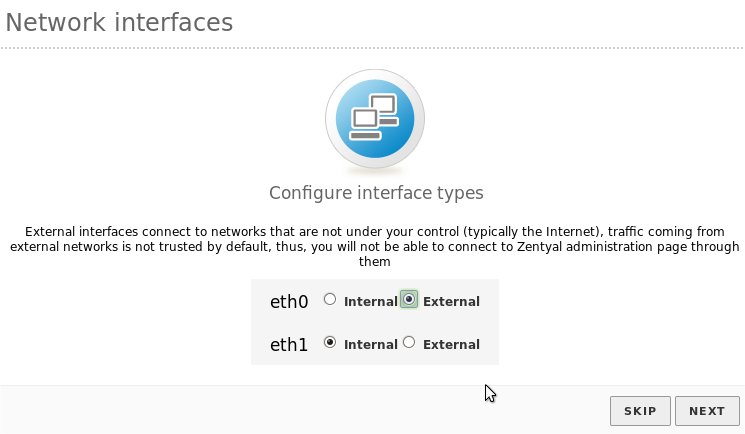
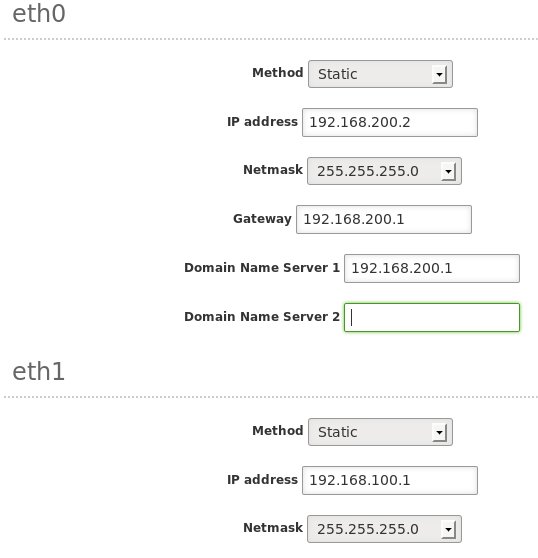
I usually configure eth0 to be external and static. I like to use a different subnet this side of the server.
IP: 192.168.200.2
Gateway: 192.168.200.1
Netmask: 255.255.255.0
DNS1: 192.168.200.1
DNS2: 192.168.0.9   (Your DNS server on your real LAN)
If I add a second external router I use IP 192.168.201.2 etc.
Now to configure eth1 for the internal network, our LAN. Again I set this up as static
IP 192.168.100.1
Netmask: 255.255.255.0
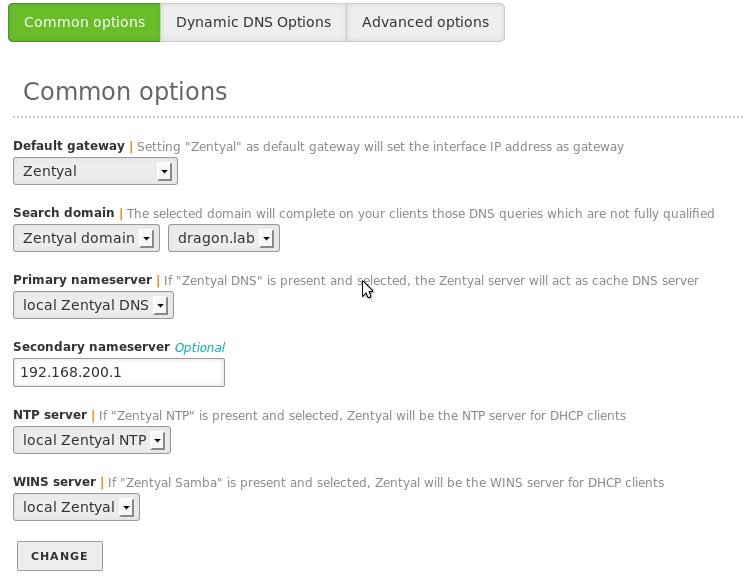
The next screen should already be filled in with the domain. I use the defaults here for Standalone server and the host name is dragon.lab. Remember to change the domain to what ever you are using.
The virtual mail domain will only come up if you installed the mail service. If it does add the domain that will be used for the mail server. That will most likely be the same as the domain.
Then there is a slight pause while that lot gets bent into shape. Ok the slight pause is long enough to get a coffee 🙂
Go to the Module Status Configuration page, annoyingly, the DHCP service is turned off by default. That needs to be turned on. Remember to save the changes. The button is at the top of the page.
Create a self signed certificate for your domain in the Certificate Authority -> General page. Remember to save the changes.
We then need to enable it’s use for all the services Zentyal will be running. So head over to the Services Certificates page. Tick the box for Zentyal Webadmin and any other boxes for services you want to use the certificate. This will enable it. Remember to save the changes. You will need to reload the browser page as it will lose connection due to the new certificate. 🙂
As this is a self signed certificate you get the scary message about accepting it.
Assuming you installed the Web server, or when you do later on. If you need to use SSL then it needs to be enabled. The default is port 443 which is also the default for the Zentyal web portal, that is why we moved the portal over to 444 during the installation. If you didn’t configure it or used the Zentyal Installer then this can be changed in the System option under the General sub-option. Then scroll down to Administration interface TCP port.

DNS configuration
Lets start with the DNS configuration. Open the DNS page and set up a forwarder. This could be your router or your own DNS server.
In my case it will be 192.168.200.1 which the virtual subnet side of my lab-router.
Scroll down to the Domains table and look at the Domain IP Addresses for your domain. Delete the external IP address, 192.168.200.2, if it is listed, that’s the one on eth0 and connects to your router to the internet. There should only be one or more internal IP addresses listed. I’m using 192.168.100.1.
Go back to the Domains page. Do the same check by clicking on the Hostnames configure icon in the table cell. This opens a new page. Click on the IP addresses icon for your host name. The IP address for the external IP, 192.168.200.2, is not needed.
On the hostnames sub-page we can setup the DNS record types:
- Hostname = A records
- Mail Exchanges = MX records
- Alias = CNAME records
Go back to Hostnames and enter all the PC’s, machines, printers, copiers etc., that will be using a static IP address. For hosts that will have an alias create the CNAME records the alias button.
Remember to save the changes.
NTP configuration
Head over to NTP configuration. You may want to change the currently configured servers, so that they are a little closer to where-ever you are. I’m in the UK so I use the UK pool, what a surprise, 0.uk.pool.org, also change 1 & 2.
Make sure the tick box, at the top of the page, for Enable synchronization with external servers is also ticked.

Remember to save the changes.
DHCP configuration
Time to configure the DHCP server, click on the icon to open the page. There will be a table displaying your NIC’s. Disable any external interfaces, in my case I disable eth0. We don’t want to lease DHCP IP’s on that interface.
Once done save changes.
Click on the configure button in the table for any remaining interfaces.
Setup the common options,
Scroll down and enter the range of IP address you want your DHCP to hand out. I use 192.168.100.100 – 192.168.100.150 which is plenty of addresses for the test lab. In a production setup you will probably want a few more.
Also, add any exclusions for IP addresses that fall inside the range where you have static addresses that cannot be moved. Do that in Fixed Addresses.
Lastly click on the tab at the top of the page for Dynamic DNS Options.
Enable it. Dynamic domain should be the domain you are using. Static domain I set to Same as Dynamic Domain.
Save the changes
Firewall configuration
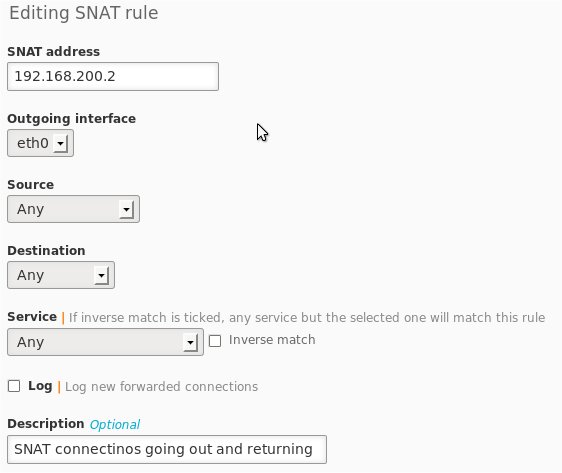
For now leave the firewall settings as they were set. except for the SNAT settings, we will need one rule setup before we can get out to the internet.
open up the SNAT configuration page. We need to be able to NAT packages from within out Zentyal LAN, so we can access the internet with a browser, or ssh etc.
Testing the network
You should at this point have a working network. Using a desktop test machine configured to use DHCP you should now be able to ping all machines in the 192.168.100.0/24 subnet and also ssh to them depending on your firewall rules. You will also be able to talk to the internet. Test it out with a browser on the lab desktop machine.
That is the end of part one. Take a look at part two. In that we will bwe setting up users and groups and adding PCs to the domain.