This tutorial will be installing an OpenVPN Server on Ubuntu 14.04 using routing and giving the external client full access to your LAN.
Installing an OpenVPN Server on Ubuntu 14.04 is not that difficult when you have already gained the necessary skills and knowledge for, IP addresses, netmasks, subnets, DNS names, IP routing, routers, network interfaces, LANs, gateways, and firewall rules.
The best choice for learning about the OpenVPN software is to read their documentation. The howto is based heavily on theirs and it would be far better to read the original. I put this here So I have a record of what I did toy get it going and have a record when I need to do it again. These three pages I found particularly helpful.
I would strongly suggest you read at least the first two all the way through before starting anything. There is extensive documentation on the OpenVPN site.
So, I couldn’t put you off and you are determined to use this howto. Remember it was your decision :-).
I used my test network lab while learning how to so this. You will be messing with networks and iptables, it is far better to do that in a separate test environment than on your local LAN. You need to build the lab router. Think of that as the router your ISP sent you and nothing more.
I’m assuming you need OpenVPN to connect to a M$ Windows desktop, so you will need access to one of those. You will need to bend the network around, on the M$ PC, so it is part of the test lab network.
You then need another virtual machine to act as your DNS and DHCP server for the test lab. I used the same setup as I did for this post DNS with bind9 and DHCP on Ubuntu 14.04.
I put the OpenVPN server on to the DNS & DHCP server. So with that lot all installed and running we can begin. You did make yourself a coffee, didn’t you?
Networking overview.
Local LAN
- IP Range 10.1.200.0/24
- Netmask 255.255.255.0
- Gateway 10.1.200.3
- DNS & DHCP 10.1.200.3
OpenVPN
- IP Range 10.8.0.0/24
- Netmask 255.255.255.0
- Gateway 10.1.200.3
- DNS & DHCP 10.1.200.3
Update the Base Server
Start with an up to date and fully patched base installation for your server.
sudo apt-get update
sudo apt-get dist-upgrade
sudo reboot
As this howto will be setting up servers, always open a terminal to tail the file /var/log/syslog and leave it running all the time. It will give you a window on what is happening.
sudo tail -f /var/log/syslog
Installing The Software
Open a second terminal and get to a root shell. This howto needs to be run from one, rather than using sudo for each command.
sudo -i
Now to install the software we need.
apt-get update
apt-get install openvpn easy-rsa
Configuring the Server
Part of the installation were some excellent example VPN server configuration files, we will take advantage of them.
cd /etc/openvpn
cp /usr/share/doc/openvpn/examples/sample-config-files/server.conf.gz .
gunzip server.conf.gz
We can now start configuring our OpenVPN server. Edit the server.conf file.
nano /etc/openvpn/server.conf
Most of the settings are already set as we want them, here are the exceptions. Use a 2048 bit encryption file this doubles RSA key length, a good thing. changer the 1024 to 2048.
dh dh2048.pem
Uncomment the redirect-gateway line.
push "redirect-gateway def1 bypass-dhcp"
Update the DNS server IP pushed out by DHCP.
push "dhcp-option DNS 10.1.200.3"
As we are running on Linux we can make it more secure and run the OpenVPN daemon as an unprivileged user instead of root. Uncomment the user and group lines.
user nobody
group nogroup
There are two other settings but for now leave them as they are, more about them later.
cert server.crt
key server.key
Leave these two pointing to server.crt and server.key.
Allow Port Forwarding
Now we need to configure iptables/sysctrl to allow port forwarding
To turn on port forwarding we have some choices, to do it until the next reboot use the following.
echo "1" > /proc/sys/net/ipv4/ip_forward
You can use sysctl to perform the same function but this will not work through a reboot
sysctl net.ipv4.ip_forward=1
Or you can edit the conf file as shown below.
nano /etc/sysctl.conf
# Uncomment the next line to enable packet forwarding for IPv4
net.ipv4.ip_forward=1
Setup Firewall Rules
We need to setup some firewall rules to
- Allow established connections to receive replies.
- NAT the OpenVPN subnet to our LAN.
- Forward connections from the OpenVPN subnet to our LAN.
When playing around with any firewall rules, I always make sure I can access the machine without any network. I also create a script to turn the firewall OFF. Also, I set up the iprules so i have to manually run them after the machine boots just in case. That way ifwhen I lock myself out of the network, I can easily gain access again. Once everything it running and tested then I add then to run at boot time. We do that towards the end of this post, if I remember 😉
In the home directory for root create the following files, the first one turns the firewall off. The second one is where you can play around with rules while trying things out.
Now we can create the firewall scripts on your OpenVPN server.
cd
nano fw.stop_all
#!/bin/bash
#
echo "Stopping firewall and allowing everyone..."
iptables -F
iptables -X
iptables -t nat -F
iptables -t nat -X
iptables -t mangle -F
iptables -t mangle -X
iptables -P INPUT ACCEPT
iptables -P FORWARD ACCEPT
iptables -P OUTPUT ACCEPT
Now to create the script that wioll set the firewall rules.
nano fw.openvpn
#!/bin/bash
#
# Turn off the firewall
/root/fw.stop_all

# Allow replies to established connections
# ========================================
iptables -I FORWARD -m conntrack --ctstate RELATED,ESTABLISHED -j ACCEPT

# Sort out NATing for OpenVPN to lab machines
# ===========================================
iptables -t nat -I POSTROUTING -o eth0 -s 10.8.0.0/24 -j MASQUERADE

# Allow traffic initiated from VPN to access LAN
iptables -I FORWARD -i tun0 -o eth0 -s 10.8.0.0/24 -d 10.1.200.0/24  -m conntrack --ctstate NEW -j ACCEPT

# Logging REJECTed packets
# ==========================
# These just log rejected packets so you can see from the syslog where you messed up.
iptables -N LOGGING
iptables -A INPUT -j LOGGING
iptables -A LOGGING -m limit --limit 2/min -j LOG --log-prefix "IPTables Packet Rejected: " --log-level 7

# REJECT all remaining packets
# ============================
# This rule must be LAST, it blocks all remaining new INPUTs on eth0
iptables -A INPUT -i eth0 -j REJECT

# OR set the default action for INPUT to be DROP
# This has the same effect but I found it causes a 3 second delay
# when accepting connections. This rule can go anywhere, first or last.
#iptables -P INPUT DROP
Set the permissions so only root can see and execute them.
chmod 700 fw*
Run the script to stop the firewall and check that it has done its job. The output from the second command should show only empty chain in your iptables..
/root/fw.stop_all
iptables-save
Run the script to add the OpenVPN rules.
/root/fw.openvpn
We will also need to open ports and rules to our router. This was all done in my test lab. I added the following rules to it.
# OpenVPN
# =======
# open the VPN port
iptables -A INPUT -i eth0 -p udp --dport 1194 -j ACCEPT
# Forward OpenVPN connections to lab-addc1
iptables -t nat -A PREROUTING -p udp --dport 1194 -i eth0 \
         -j DNAT --to 10.1.200.3:1194
This allows the UDP port 1194, OpenVPN, on the internet side and forwards it to the same port number on our lab-openvpn-server, 10.1.200.3. I have similar stop and start scripts on the lab-router so I ran those. You may need to reboot.
Creating a Certificate Authority and the Server-Side Certificate and Key
OpenVPN secures the connections using encryption, the encryption uses keys and certificates in the same way HTTPS does.
We will start by building our certificate of authority. Most of the hard work has been done as we installed the Easy-RSA generation scripts. copy these to our OpenVPN directory
cp -r /usr/share/easy-rsa/ /etc/openvpn
Make the subdirectory where our keys and certificates will be generated and change directory to easy-rsa.
mkdir /etc/openvpn/easy-rsa/keys
cd /etc/openvpn/easy-rsa
Now edit the vars file and set the KEY_COUNTRY, KEY_PROVINCE, KEY_CITY, KEY_ORG, KEY_EMAIL and KEY_OU parameters. Don’t leave any of these parameters blank. These are all down towards the end of the file.
nano vars
export KEY_COUNTRY="GB"
export KEY_PROVINCE="Hampshire"
export KEY_CITY="Dragons Cave"
export KEY_ORG="Your Companty Name"
export KEY_EMAIL="me@dragon.lab"
export KEY_OU="What ever you like"
Just after those settings there is one other setting, KEY_NAME. Change that to be server. it is why we left the cart and key parameters pointing at server.crt and server.key. It is the name of those files.
export KEY_NAME="server"
Remember we also changed the setting to use 2048 bit encryption we need to create that file now, it is the Diffie-Hellman parameters file. This can take several minutes, time for another coffee, really it takes ages even on a fast machine. The longer the machine has been booted for the faster it completes.
openssl dhparam -out /etc/openvpn/dh2048.pem 2048
Building Our CA
The vars file we prepared as above can now be sourced, this pre-loads the necessary values when building keys. It is always prudent to clean the work area before you start using it that way you know you are starting from a known and re-creatable position.
source ./vars
./clean-all
./build-ca
We can accept all the defaults for these options, they come from the vars file we just updated. The output should look something like this:
Generating a 2048 bit RSA private key
.............................+++
.......................................................................................................+++
writing new private key to 'ca.key'
-----
You are about to be asked to enter information that will be incorporated
into your certificate request.
What you are about to enter is what is called a Distinguished Name or a DN.
There are quite a few fields but you can leave some blank
For some fields there will be a default value,
If you enter '.', the field will be left blank.
-----
Country Name (2 letter code) [GB]:
State or Province Name (full name) [Hampshire]:
Locality Name (eg, city) [Dragons Cave]:
Organization Name (eg, company) [Your Companty Name]:
Organizational Unit Name (eg, section) [What ever you like]:
Common Name (eg, your name or your server's hostname) [Your Companty Name CA]:OpenVPN-CA
Name [server]:
Email Address [me@dragon.lab]:
Server, Certificate and Key
To generate the server key and certificate we use the command below, we are using server and the name this is the same string we used in server.conf and the KEY_NAME variable in the vars file.
./build-key-server server
You can accept the prompts as before the defaults come from the vars file. The two prompts about setting a password or company name can be left blank.
Answer yes to the last two prompts to sign the certificates and commit them. The output should look similar to this.
Generating a 2048 bit RSA private key
..............................+++
........+++
writing new private key to 'server.key'
-----
You are about to be asked to enter information that will be incorporated
into your certificate request.
What you are about to enter is what is called a Distinguished Name or a DN.
There are quite a few fields but you can leave some blank
For some fields there will be a default value,
If you enter '.', the field will be left blank.
-----
Country Name (2 letter code) [GB]:
State or Province Name (full name) [Hampshire]:
Locality Name (eg, city) [Dragons Cave]:
Organization Name (eg, company) [Your Companty Name]:
Organizational Unit Name (eg, section) [What ever you like]:
Common Name (eg, your name or your server's hostname) [server]:
Name [server]:
Email Address [me@dragon.lab]:

Please enter the following 'extra' attributes
to be sent with your certificate request
A challenge password []:
An optional company name []:
Using configuration from /etc/openvpn/easy-rsa/openssl-1.0.0.cnf
Check that the request matches the signature
Signature ok
The Subject's Distinguished Name is as follows
countryName           :PRINTABLE:'GB'
stateOrProvinceName   :PRINTABLE:'Hampshire'
localityName          :PRINTABLE:'Dragons Cave'
organizationName      :PRINTABLE:'Your Companty Name'
organizationalUnitName:PRINTABLE:'What ever you like'
commonName            :PRINTABLE:'server'
name                  :PRINTABLE:'server'
emailAddress          :IA5STRING:'me@dragon.lab'
Certificate is to be certified until May 22 11:11:14 2025 GMT (3650 days)
Sign the certificate? [y/n]:y


1 out of 1 certificate requests certified, commit? [y/n]y
Write out database with 1 new entries
Data Base Updated
Copy the files for our server into the OpenVPN directory
cp /etc/openvpn/easy-rsa/keys/{ca.crt,server.crt,server.key} /etc/openvpn
The files should have the following permissions. note that server.key is owned by and in the group of root and only root can read or write to it.
-rw-r--r--   1 root root  1818 May 25 12:28 ca.crt
-rw-r--r--   1 root root  5737 May 25 12:28 server.crt
-rw-------   1 root root  1708 May 25 12:28 server.key
Starting and Stopping, OpenVPN Server
OpenVPN using the usual stop, start, restart commands.
sudo service openvpn start
sudo service openvpn stop
sudo service openvpn restart
sudo service openvpn status
use the restart option to get the openvpn server running. A clean start up of OpenVPN generates output like this in syslog
May 25 14:04:56 lab-addc1 ovpn-server[3228]: OpenVPN 2.3.2 x86_64-pc-linux-gnu [SSL (OpenSSL)] [LZO] [EPOLL] [PKCS11] [eurephia] [MH] [IPv6] built on Dec  1 2014
May 25 14:04:56 lab-addc1 ovpn-server[3228]: Diffie-Hellman initialized with 2048 bit key
May 25 14:04:56 lab-addc1 ovpn-server[3228]: Socket Buffers: R=[212992->131072] S=[212992->131072]
May 25 14:04:56 lab-addc1 ovpn-server[3228]: ROUTE_GATEWAY 10.1.200.1/255.255.255.0 IFACE=eth0 HWADDR=08:00:27:37:33:02
May 25 14:04:56 lab-addc1 ovpn-server[3228]: TUN/TAP device tun0 opened
May 25 14:04:56 lab-addc1 ovpn-server[3228]: TUN/TAP TX queue length set to 100
May 25 14:04:56 lab-addc1 ovpn-server[3228]: do_ifconfig, tt->ipv6=0, tt->did_ifconfig_ipv6_setup=0
May 25 14:04:56 lab-addc1 ovpn-server[3228]: /sbin/ip link set dev tun0 up mtu 1500
May 25 14:04:56 lab-addc1 ovpn-server[3228]: /sbin/ip addr add dev tun0 local 10.8.0.1 peer 10.8.0.2
May 25 14:04:56 lab-addc1 ovpn-server[3228]: /sbin/ip route add 10.8.0.0/24 via 10.8.0.2
May 25 14:04:56 lab-addc1 ovpn-server[3233]: GID set to nogroup
May 25 14:04:56 lab-addc1 ovpn-server[3233]: UID set to nobody
May 25 14:04:56 lab-addc1 ovpn-server[3233]: UDPv4 link local (bound): [undef]
May 25 14:04:56 lab-addc1 ovpn-server[3233]: UDPv4 link remote: [undef]
May 25 14:04:56 lab-addc1 ovpn-server[3233]: MULTI: multi_init called, r=256 v=256
May 25 14:04:56 lab-addc1 ovpn-server[3233]: IFCONFIG POOL: base=10.8.0.4 size=62, ipv6=0
May 25 14:04:56 lab-addc1 ovpn-server[3233]: IFCONFIG POOL LIST
May 25 14:04:56 lab-addc1 ovpn-server[3233]: Initialization Sequence Completed
If will look at the output from ifconfig we now have a tun0 device, similar to this:
tun0      Link encap:UNSPEC  HWaddr 00-00-00-00-00-00-00-00-00-00-00-00-00-00-00-00
          inet addr:10.8.0.1  P-t-P:10.8.0.2  Mask:255.255.255.255
          UP POINTOPOINT RUNNING NOARP MULTICAST  MTU:1500  Metric:1
          RX packets:0 errors:0 dropped:0 overruns:0 frame:0
          TX packets:0 errors:0 dropped:0 overruns:0 carrier:0
          collisions:0 txqueuelen:100
          RX bytes:0 (0.0 B)  TX bytes:0 (0.0 B)
Certificates and Keys for Clients
We will be using the certificate authority we created to generate keys and certificates for our clients. Each client should have a unique set for OpenVPN to work. OpenVPN can be configured to allow duplicates, doing so would weaken the security which defeats the point of using a VPN in the first place.
To generate the necessary files for our clients we run the build-key command once for each. Giving it a name for the output file. The name can be anything, to keep your own life simpler make them unique and meaningful. Do not be tempted to use client1, client2, laptop1, android1 etc. With that in mind we will use win7_fred. Then we know it will be for Fred’s Windows 7 Laptop.
./build-key win7_fred
As with the server we can accept the defaults all the way through, and answer yes to the two prompts at the end.
Generating a 2048 bit RSA private key ....................+++ ......................................................+++ writing new private key to 'win7_fred.key' ----- You are about to be asked to enter information that will be incorporated into your certificate request. What you are about to enter is what is called a Distinguished Name or a DN. There are quite a few fields but you can leave some blank For some fields there will be a default value, If you enter '.', the field will be left blank. ----- Country Name (2 letter code) [GB]: State or Province Name (full name) [Hampshire]: Locality Name (eg, city) [Dragons Cave]: Organization Name (eg, company) [Your Companty Name]: Organizational Unit Name (eg, section) [What ever you like]: Common Name (eg, your name or your server's hostname) [win7_fred]: Name [server]: Email Address [me@dragon.lab]: Please enter the following 'extra' attributes to be sent with your certificate request A challenge password []: An optional company name []: Using configuration from /etc/openvpn/easy-rsa/openssl-1.0.0.cnf Check that the request matches the signature Signature ok The Subject's Distinguished Name is as follows countryName :PRINTABLE:'GB' stateOrProvinceName :PRINTABLE:'Hampshire' localityName :PRINTABLE:'Dragons Cave' organizationName :PRINTABLE:'Your Companty Name' organizationalUnitName:PRINTABLE:'What ever you like' commonName :T61STRING:'win7_fred' name :PRINTABLE:'server' emailAddress :IA5STRING:'me@dragon.lab' Certificate is to be certified until May 22 12:32:02 2025 GMT (3650 days) Sign the certificate? [y/n]:y 1 out of 1 certificate requests certified, commit? [y/n]y Write out database with 1 new entries Data Base UpdatedThis creates three new files in the keys subdirectory called win7_fred.crt, win7_fred.csr and win7_fred.key. You can now repeat the command for each OpenVPN client for which you want to generate keys.
Before we can use them we need to configure the OpenVPN configuration file. Again there is an example file we can use as a basis. When we copy it over rename it to win7_fred with an extension of opvn as that is the extension the client end expects.
cp /usr/share/doc/openvpn/examples/sample-config-files/client.conf \ /etc/openvpn/easy-rsa/keys/win7_fred.ovpnThe client config will need a few changes, so load it up in an editor
nano /etc/openvpn/easy-rsa/keys/win7_fred.ovpnFind the remote parameter this should be the external name or IP address for your router. In my case it will be the NIC that is on the outside of my lab network. lab-router1, 192.168.0.4 on eth0.
remote lab-router1 1194If we are connecting from Linux we can make it more secure and run the OpenVPN daemon as an unprivileged user instead of root. Uncomment the user and group lines.
user nobody group nogroupWe can also comment out the three lines for ca, cert and key as we will be creating a client config file in a unified format.
#ca ca.crt #cert client.crt #key client.keyNow go to the end of the file and create three pairs of xml tags, one for each ca, cert and key. Copy/paste the contents of the files into those tags.
copy ca.crt here copy win7_fred.crt here copy win7_fred.key here Using the unified format means we only need to transport one file and not four.
Installing OpenVPN Client
On Windows
Download the OpenVPN client from the OpenVPN downloads page . Once downloaded check the GPG signature.
To install the file on the client, we need to securely transport the file win7_fred.opvn to the client end. So do not email it!
On Windows the file should be placed in
C:\Program Files\OpenVPN\configAs an Administrator run OpenVPN, it needs admin rights to create the TUN network adaptor. Once that it running and you can see the taskbar icon of a VDU and an open padlock, open a cmd.exe window and run ipconfig and you should see the new tap adaptor.
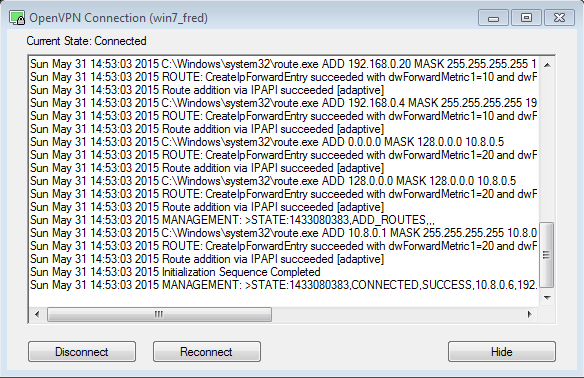
ifconfigEthernet adapter Local Area Connection 2: Connection-specific DNS Suffix . : Description . . . . . . . . . . . : TAP-Windows Adapter V9 Physical Address. . . . . . . . . : 00-FF-9D-AA-38-5A DHCP Enabled. . . . . . . . . . . : Yes Autoconfiguration Enabled . . . . : Yes Link-local IPv6 Address . . . . . : fe80::9cd7:4381:7df3:c2fd%13(Preferred) IPv4 Address. . . . . . . . . . . : 10.8.0.6(Preferred) Subnet Mask . . . . . . . . . . . : 255.255.255.252 Lease Obtained. . . . . . . . . . : 31 May 2015 14:52:58 Lease Expires . . . . . . . . . . : 30 May 2016 14:52:58 Default Gateway . . . . . . . . . : DHCP Server . . . . . . . . . . . : 10.8.0.5 DHCPv6 IAID . . . . . . . . . . . : 302055325 DHCPv6 Client DUID. . . . . . . . : 00-01-00-01-1C-FC-70-13-08-00-27-DC-59-A8 DNS Servers . . . . . . . . . . . : 10.1.200.3 NetBIOS over Tcpip. . . . . . . . : EnabledIf that all worked right click on the OpenVPV icon and select Connect. This should open the status window. When the connection is made it should look similar to this and a popup should tell you the new IP address.
You can now use Remote Desktop Connection to access Windows machines inside the test network. I used lab-win7.black.dragon.lab. You may need to adjust the remote access permissions for the machine who's desktop you are connecting in to.
You now have an OpenVPN Server on Ubuntu 14.04, well done.
Tidy Up Unneeded Files
You do not need to keep the client key or config files on the server they can therefore deleted once copied over to the client.
Security
This setup is not secure. The firewall does not close any ports, in fact they are all open. You should sort out the firewall before using this on a production environment. The OpenVPN HOWTO has a section on hardening security it is also worth a read through.
I really like your blog, your humor and the highlighting commands and outputs. I will try to setup openvpn for my current home LAN. I used to do FTP to access my files :), not very secure.