This post will run through Installing phpLDAPAdmin on Ubuntu 16.04. You will need a server or desktop install that has a working LDAP server on it.
This HOWTO also works on a Raspberry PI 3 running the Ubuntu MATE image!
Do not do this on a production server until you have tried it out and have a working LDAP server.
For this HOWTO I am building using the following posts.
- my test networking lab, Setup a Test Networking Lab with VirtualBox.
- A minimal Ubuntu server running 16.04.
- Installing LDAP on Ubuntu 16.04
We will be using a machine with a hostname of ldap.dragon.lab. It will need an entry on your local DNS.
Let’s start off by installing phpLDAPadmin on Ubuntu 16.04 and other related software.
sudo apt-get update
sudo apt-get install apache2-utils phpldapadmin libarchive-zip-perl
Configure phpLDAPAdmin
We begin by telling phpldapadmin how to connect to our LDAP server and how to render its pages for some custom layouts.
sudo nano /etc/phpldapadmin/config.php
$config->custom->appearance['hide_template_warning'] = true;
$config->custom->appearance['attr_display_order'] = array(
   'givenName',
   'sn',
   'cn',
   'uid',
   'homeDirectory',
   'uidNumber',
   'gidNumber',
   'loginShell',
   'userPassword'
  );
$servers->setValue('server','host','127.0.0.1');
$servers->setValue('server','base',array('dc=dragon,dc=lab'));
$servers->setValue('login','bind_id','cn=admin,dc=dragon,dc=lab');
$servers->setValue('auto_number','min',array('uidNumber'=>10000,'gidNumber'=>10000));
$servers->setValue('custom','pages_prefix','custom_');
The server, host This can be 127.0.0.1 if the web server for LDAP is run on the same machine otherwise it must be the IP address for your LDAP server.
server, base is the distinguished name (DN) for your server.
login, bind, this is the name of the Administrative user on LDAP with the server base added to it.
auto_number, sets the start value for LDAP People (uid) and group (gid). They can be the same value.
custom, pages_prefix sets the prefix for custom templates, see later.
Save the file and exit the editor. Now we can add a custom template to set the layout for the User page.
sudo -i
cd /usr/share/phpldapadmin/templates/creation
cp posixAccount.xml custom_posixAccount.xml
chgrp www-data custom_posixAccount.xml
logout
sudo nano /usr/share/phpldapadmin/templates/creation/custom_posixAccount.xml
Change the value in the tag for Description and Title to Generic: Posix User. I also like to reorder the file the contents between the attributes tabs. They should read something like this:
	First name
	ldap-uid.png
	=autoFill(cn;%givenName% %sn%)
	=autoFill(uid;%givenName/l%)


	Last name
	=autoFill(cn;%givenName% %sn%)
	1


	Common Name
	1


	User Name
	=autoFill(homeDirectory;/home/ldap/%uid%)


	Home directory
	1


	UID Number
	terminal.png
	1
	=php.GetNextNumber(/;uidNumber)


	Primary Group


	Login shell
	select
	/bin/bash
	/sbin/nologin
	/bin/sh
	/bin/csh
	/bin/tsh


	Password

	lock.png
	=php.PasswordEncrypt(%enc%;%userPassword%)
	1
	1
Save the file and exit the editor.
SSL Certificates
You will need to either generate some self signed SSL certificates for yourself or get them from a company that provides signed SSL Certs, I use SSL certificates from Let’s Encrypt SSL Certs. They are free and easy to setup. The tutorial they provide for setting up Let’s Encrypt SSL certs is very good.
Once you have you SSL certs, you can carry on, I will assume that you are using certs from Let’s Encrypt. They will be stored in a directory structure starting with /etc/letsencrypt/domain.tld.
Apache Configuration
We will add a layer of security to our LDAP server, we will only allow access to it via a password, that is before the user sees the login page and is asked to login to the web interface. Run the following command, it will create the password file that we will use in our apache config. Inside the file will be one user ldap_admin, change the user name to something else do not use ‘admin’ or ‘manager’. Then enter a secure password.
sudo htpasswd -c /etc/apache2/htpasswd ldap_admin
We will only access our LDAP server via HTTPS, this means we need to turn on the module for SSL and enable the default ssl site configuration file.
sudo a2enmod ssl
sudo a2ensite default-ssl.conf
phpldapadmin provides its own configuration file for Apache. We will edit it to move its URL path as another simple security step. It will stop scripted hacking attempts to the default URL.
sudo nano /etc/phpldapadmin/apache.conf
The only thing we need to change in here is the first option of the Alias line, Change /phpldapadmin to something else. It will change the URL you will use to access the phpldapadmin web interface. I will use myldapadmin, not very secure but you get the idea. Remember the sting you use here as we will need it again and also when you access the web interface.
Alias /myldapadmin /usr/share/phpldapadmin/htdocs
Save the file and exit the editor.
On to the default apache configuration file. Here we will force all HTTP requests to be HTTPS.
sudo nano /etc/apache2/sites-available/000-default.conf
At the top of the file you will see a line setting the ServerAdmin and DocumentRoot, we will be changing those lines to read like those below. This is where you need to remember the string you changed in the Alias above. Change to domain in the ServerAdmin to be your mailserver and update the URL to point at your LDAP server.
    ServerAdmin webmaster@your.mailserver.co.uk
    DocumentRoot /var/www/html
    ServerName ldap.dragon.lab
    ServerAlias ldap
    Redirect permanent /myldapadmin https://ldap.dragon.lab/myldapadmin
Save the file and exit the editor.
On to changes in the SSL configuration for Apache. There are a few changes here in different parts of the file. The first is just after the IfModule line. The setting will allow us to use ServerName tags in an SSL file. Normally this is not available without loads of hoop jumping. Next we can update the ServerAdmin lines as we did before. Just after that we can add the new Location section. The final change it to point the SSLCertificateFile lines to the SSL certificates.
The resulting file should look similar to the following.
sudo nano /etc/apache2/sites-available/default-ssl.conf
        SSLStrictSNIVHostCheck off


		ServerAdmin webmaster@dragon.lab
                DocumentRoot /var/www/html
                ServerName ldap.dragon.lab
                ServerAlias ldap


                    AuthType Basic
                    AuthName "Who are you? Go away!"
                    AuthUserFile /etc/apache2/htpasswd
                    Require valid-user

...
#		SSLCertificateFile	/etc/ssl/certs/ssl-cert-snakeoil.pem
#		SSLCertificateKeyFile /etc/ssl/private/ssl-cert-snakeoil.key
                SSLCertificateFile /etc/letsencrypt/live/dragon.lab/fullchain.pem
                SSLCertificateKeyFile /etc/letsencrypt/live/dragon.lab/privkey.pem
                Include /etc/letsencrypt/options-ssl-apache.conf
Save the file, exit the editor and restart the apache server to take all those changes into use.
sudo systemctl restart apache2.service
Opening phpldapadmin
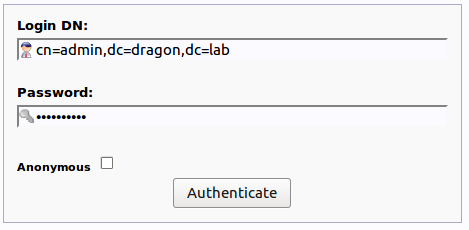
We can now open phpldapadmin with a broswer by using https://ldap.dragon.lab/myldapadmin/. You should see a popup with “Who are you? Go away!” or whatever text you used in the AuthName tag in the Location tag above. Enter the user name and password you used from the previous htpasswd command. That should allow you access to the phpldapadmin web portal. Click on the login link and enter the password for your LDAP server.
Now open up the tree view on the left hand side, it should look similar to the following:
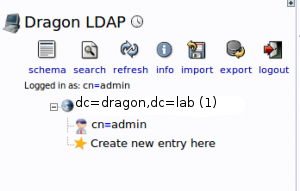
Adding People and Groups
To add People and Groups to our LDAP server we need to add two organizational units in LDAP terms. Do this by clicking on the branch, Create new entry here and that will open up a new panel in the middle.
Choose to add a new organizational unit, one for Groups and another for People. Just enter the name or the unit and click the create object button. Then commit the new unit.
To add some groups, click on the groups branch on the tree. That opens up another panel. Click on the entry Create a child entry.

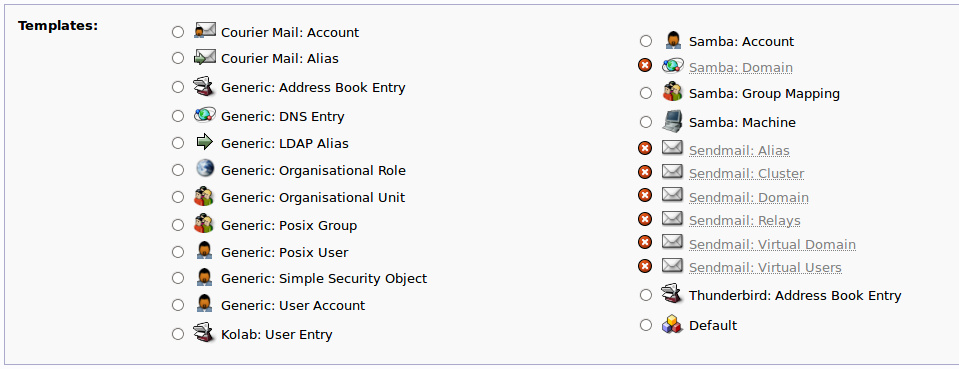
Choose to add a new Generic: Posix Group on the new screen enter the name of the group. Lets start with one called admin. Enter then name of the group, create it and commit the new group. repeat the process for each of the following groups.
Create groups for these
admin
ldap-users
fred, bert (one for each Linux user)
Adding People is similar to adding groups there are just a few more fields to fill in. Choose the option to add a Generic: Posix User, remember that was the name of the template we created above. Follow the process above to create the following People. For the Primary Group field in each user choose the one which is the same as their name. The password encryption method should be left at MD5.
| People | Groups |
|---|---|
| fred | fred admin ldap-users |
| bert | bert ldap-users |
Adding People to Groups
To add people to groups, click on the group branch. This will open up and display the properties of that group.

Click on the option Add new attribute, this will open up a pull down with three options, choose memberUid. That will add a new input panel to the page. As we are adding a new user to the admin group lets put fred in the box. This will add fred to the admin group. If you want to add more people to a group you can now click on the add value or Modify values options. Take a look at those.
Using the table above add the people and then add them to their groups. There is no need to add the user to the group which is the same as their name as it is their primary group and that should have been done when the user was created.