I no longer use the crippled PBIS software, I use the native Linux software which gives far better functionality.
A better way of Joining an Ubuntu Machine to Samba with Winbind
This was the third part of a series of howtos showing how to setup and use Samba4 as a drop in for MS Active Directory Server. The first part Samba4 AD DC on Ubuntu 14.04 is here. The second part in this series take a look at Administering AD DC via Windows.
In this part we will connect a Linux machine to the domain and then login with users configured with Active Directory. Therefore domain users will always have the same UID and GIDs regardless of the machine they log into.
Active Domain details
- AD DC host: lab-addc1.dragon.lab
- ip address: 10.1.200.3
- Domain: BLACK
- Realm: BLACK.DRAGON.LAB
- netbios name:LAB-ADDC1
To create desktops I used my normal install method, starting with a minimal server and then adding MATE and other packages as required.
As I use scripted installations, after the initial install I change the name of the machine to suit in /etc/hosts and /etc/hostname. I also check that /etc/network/interface is setup to use DHCP for eth0.
Installing PBIS software
The Likewise-open packages have been re-branded and messed about with by Powerbroker, PBIS is just the resulting software.
Download it by going to their site and downloading the package for Ubuntu, I’m using the 64-bit version. I save downloads to my Desktop.
From the command line you can use the following, please note that this may not work when the version is updated.
wget https://download.beyondtrust.com/PBISO/8.0.1/linux.deb.x64/pbis-open-8.0.1.2029.linux.x86_64.deb.sh
There is no need to make the file executable as it is a ‘sh’ script and we can prefix the file with bash. We can run it as root like this:
sudo bash ~/Desktop/pbis-open-8.0.1.2029.linux.x86_64.deb.sh
You do not need the legacy links, and you do want to install the software.
At the end of the installation a GUI will pop up, just click cancel. Using the GUI did not work for me. But that may change in the future.
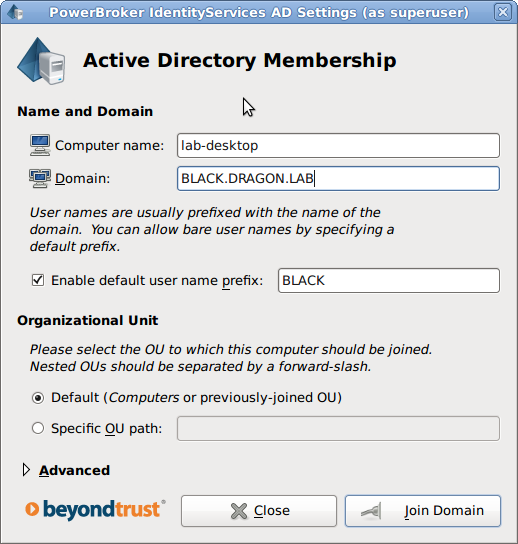
Joining the domain
To join the desktop to your domain we can use either the GUI or a CLI. I tend to go for command lines, but here are both.
sudo /opt/pbis/bin/domainjoin-cli join black.dragon.lab administrator
After running the command line you should see a SUCCESS message. I also see some warnings about not being able to restart sshd. You will not be able to login to the domain until after a reboot. Hold up a minute we will do that in a minute.
The GUI looks like this:
Do not reboot just yet we have a couple of other changes to make first.
sudo /opt/pbis/bin/config UserDomainPrefix BLACK.DRAGON.LAB
sudo /opt/pbis/bin/config AssumeDefaultDomain true
sudo /opt/pbis/bin/config LoginShellTemplate /bin/bash
Setting the location for the users home directories can also be configured. We can use some place markers here to setup defaults.
- %H /home
- %D The short domain name, BLACK
- %U the users Windows/Linux user name, fred, bert, mary
sudo /opt/pbis/bin/config HomeDirTemplate %H/%U
See the PBIS documentation for more options and configurations settings. /opt/pbis/docs.
Configuring PAM
For Ubuntu we need to make a small change to the PAM configuration file, /etc/pam.d/common-session, we will be replacing the existing line
session sufficient pam_lsass.so
with the one below.
sudo nano /etc/pam.d/common-session
session [success=ok default=ignore] pam_lsass.so
Logon or Greeter screen
You may like to update your greeter screen, to remove guest logins, the second turns on the “Other..” option if it does not already appear. I did not need it.
sudo nano /etc/lightdm/lightdm.conf
allow-guest=false
greeter-show-manual-login=true
Giving ‘sudo’ Permissions
With Ubuntu you can add a user to the sudo group which will allow the user to run all commands as root.
sudo usermod -a -G sudo fred
Or you can automatically give root permissions to user who are in a domain group. For example, to give sudo access to any user who is a member of domain^admins, add the following to the sudoers file. You need root access to add entries to the file 🙂
sudo visudo
%BLACK\\domain^admins ALL=(ALL:ALL) ALL
Now reboot and login as one of your Domain users, for example fred. If all went well, after a short delay as the new home director is created and populated with defaults, you will see a new desktop.
Testing those permissions
Assuming you have already created, using the Windows admin tools, the test users Fred, Bert and Mary along with the shared folders finance and shared. You can now log in to the domain with each of the three users or use the su command to chage without logging out and back in as a new user.
Fred and Mary should be able to access both folders and also create and modify files in the share.
While Bert ‘the drudge’ Worker will only be able to do stuff in shared.
To use caja (File Manager) to access the shares type smb://lab-addc1 into the location input and press return. Then proceed as normal once the shares are displayed.
If that is not the case go back and check the permissions setup for the users and shares using the Windows tools.