Welcome to part two of my Zentyal howto. If you missed part 1, you can see it here. it covers the initial configuration installation and getting the network up and usable.
In part two we will be setting up
- Users
- Groups
- File sharing
- Limited access File sharing
- Adding machines to the domain.
- Windows
- Linux
We will be setting up some users and groups and then testing them out with Linux and then Windows.
Users and Computers
LDAP config
Open up your Zentyal Admin Portal and navigate to Users and Computers and then LDAP. You will see at the top of the page are the LDAP settings already configured from the data you have already applied. At the end of the page under PAM settings, go ahead and enable PAM.
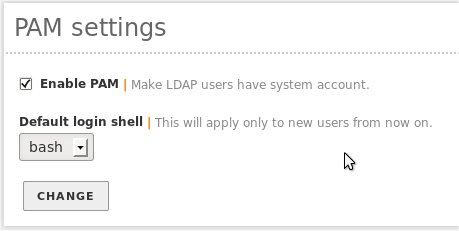
Remember to save the changes.
Setup Some Groups
It is nice to be able to put users into groups. By doing that you can allocate permissions or mailing lists for the group rather than adding and amending each user individually. Most companies have a Finance or Accounting department, the files they generate are generally confidential. They think so anyway 🙂 Finance is therefore a good choice to demonstrate the power of groups and permissions.
Let’s create a Finance group. Head over to Users & Computers and then the sub-option Manage. This will open a page with two panes. Click on the Groups branch and then click on the green cross at the bottom of that pane.

When the dialog opens, it should be defaulting to creating a security group. Quick side line, 🙂 A security group is where you set permissions, the distribution group is a mailing list.

That was pretty simple.
User Templates
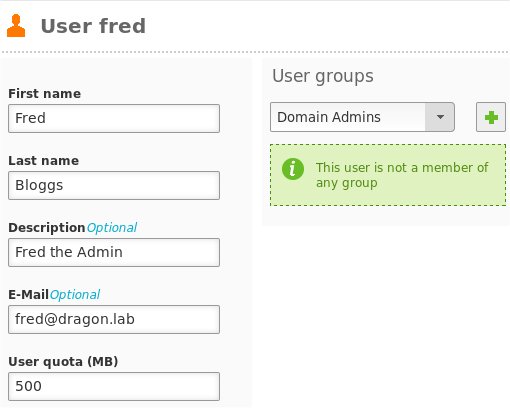
Before creating any users, we should take a quick look at the User template settings. One in particular will almost definitely need changing. The page holds the defaults that will be used when any new user is created. Getting this right for most users at an early stage will save you time. Also if you are going to create a new bunch of users that will use different defaults to the norm make a change here first. Change it once, use it many times 🙂
If you are going to apply user quotas for disk space the default is 500M. You will probably want to change that to something a little larger.
Remember to save any changes.
Setup Some Users
Users are setup the same way as groups. Click on the users branch in the tree and then click the green cross to open up the dialog. Create a user, I’m using Fred, he will be a Domain Admin.
Tip: If you are creating users which will also have Linux/Unix accounts only
     use lowercase letters and numbers for the user name. It will make
     YOUR life simpler!
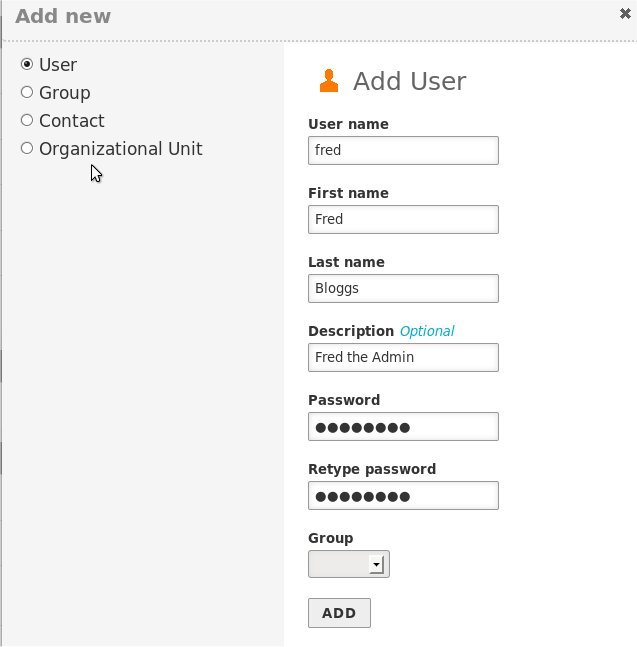
Now make sure to add him to the Admin group.
Now create two more users, one will be in the Finance group, you can select that when creating the user. The last user is in no groups at all.
I use Mary the finance lady, and Bert the drudge.
There is no need to remember to save the changes here. Changes are saved as you make them, so be careful.
Time to Test
Open up a terminal and get yourself root permissions. (sudo -i or su -)
To create the base directory and the directory you want to share out. No need to worry about permissions these will be set when you setup the share in the Zentyal portal.
sudo -i
mkdir -p /shares/finance
If you cannot use a command line :-(, use a GUI file manager. Again, create a sub-directory called shares under root. then create another sub-directory under that is named finance.
sudo -i
caja
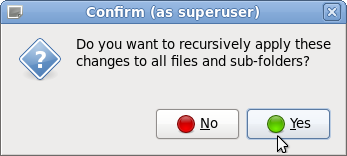
Once that is created update the permissions, as shown.
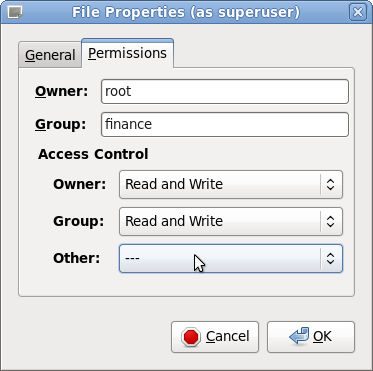
The question regarding recursing through the directory is mute as you just created the directory, therefore it has no files or directories under it.
The /shares/finance directory will be a shared folder that can then be mapped by users who are in the finance group.
Back to the Zentyal web portal, go to the File Sharing button and share out the finance directory. Make sure the tick box at the bottom regarding ACL’s is ticked.
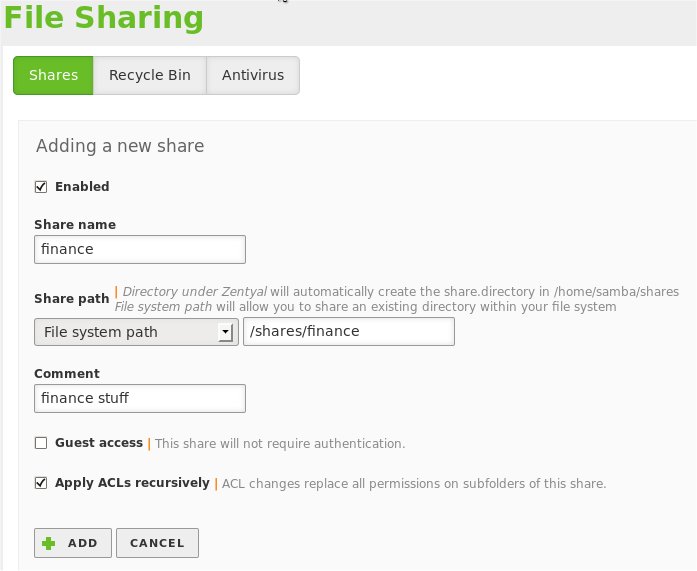
Check the enabled button for the file share we just created. Now we need to add the access control or permissions to the shared folder. Click on the Access Control button and allow only the group finance to read and write to the folder.
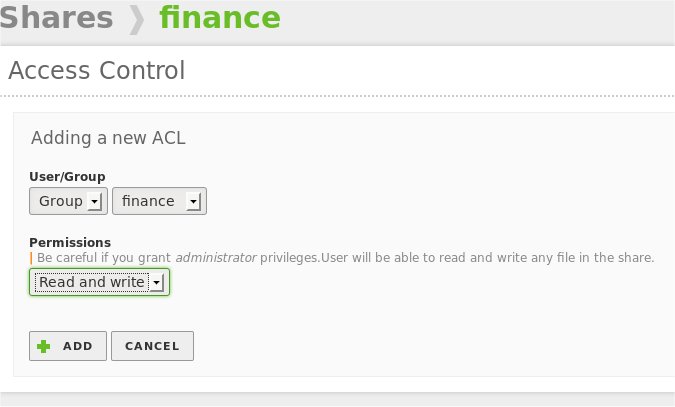
Remember to save the changes.
Adding machines to the Domain
Now for the good bit!
Windows Clients
Make sure the clock is picking up the NTP server from our Zentyal server. Kerberos needs times to be in sync for all machines connecting to the domain, so this is a must.
Windows 7/8 and XP
The joining process is very similar with all three versions of Windows XP, 7 & 8. I didn’t bother trying Vista.
The process and screen prints are from Win7.
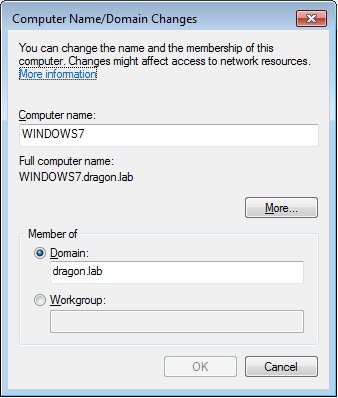
To join the domain press the [Flag]+[Pause/Break]. This brings up a dialog click on the Advanced System settings to bring up yet another dialog.
Click the domain radio button and enter the name of your domain. Click OK.
Enter the user name of your Zentyal Domain Admin, in my case Fred.
You will, in true Windows style have to reboot before anything of use happens. Once the reboot has finished you can switch user to Mary and then access the shared finance folder. Call up the run dialog, [Flag]+[R].
Type in \\yourservername\
This in turn will bring up another window with the finance folder in it. Mary should be able to read and write to this folder.
Log Mary out and try the same thing with Bert, he should not have access to the finance folder.
While any user is logged into the domain, if they change their password it changes the domain password. This can be performed on windows by pressing [CTRL]+{ALT]+[DEL] and then selecting, er um, change password of all things.
Joining the Domain from Linux
The network setting required to connect to a Windows domain are shown below. Use the first set if you are using DHCP and the second set if your machine needs a static address
auto eth0
iface eth0 inet dhcp
   hostname lab-desktop2
auto eth0
iface eth0 inet static
   address 192.168.100.11
   netmask 255.255.255.0
   gateway 192.168.100.1
   dns-search dragon.lab
   dns-nameservers 192.168.100.1 192.168.200.1
We will need to install some software.
sudo apt-get install likewise-open likewise-open-gui libglade2-0 samba
Edit the samba config file updating the line below for your domain.
sudo nano /etc/samba/smb.conf
workgroup = dragon
You might like to also point the config for WINS server towards your Zentyal server. If you do make sure “wins support = no”.
wins server = 192.168.100.1
If you installed Linux from Ubuntu and it installed MATE and lightdm rather than Unity. This next step is not necessary.
sudo nano /etc/lightdm/lightdm.conf
greeter-show-manual-login=true
sudo domainjoin-gui
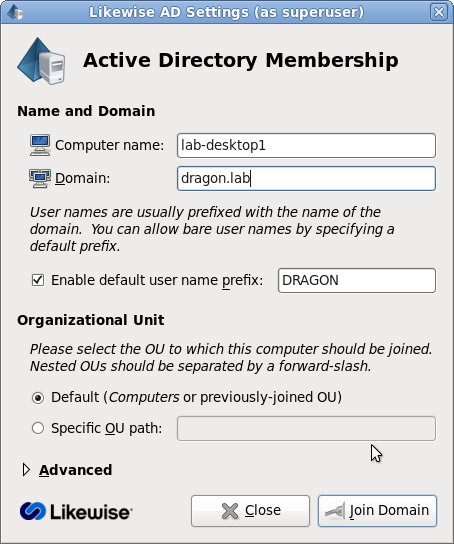
From the command line it looks like this
sudo domainjoin-cli join dragon.lab fred@dragon.lab
Joining to AD Domain:   dragon.lab
With Computer DNS Name: lab-desktop1.dragon.lab

fred@DRAGON.LAB's password:
SUCCESS
You should reboot this system before attempting GUI logins as a domain user.
While any user is logged into Linux and is connected to the domain changing their own password in Linux will also change their domain password.
passwd
Changing password for mary.
(current) UNIX password:
Enter new UNIX password:
Retype new UNIX password:
passwd: password updated successfully
You can also reset passwords, as you are a domain admin, using the Manage Users sub-option and the entering a new password in the Zentyal portal.
Testing permissions
Remember we created three users:
- Fred: A Domain Admin
- Mary: The Finance Lady
- Bert: The hard working, permission-less, drudge
To test the permissions of the finance share. Boot up a lab desktop machine, add it to the domain. Once rebooted login as Mary. Note that you do not need to setup an account on the lab desktop for Mary, here login credentials and permissions are found via LDAP, the Active Directory replacement.
To map a shareed drive on linux open up caja. In the location: box above the main display enter the server and then the share name
smb://lab-addc/finance/
or to see a list of available shares, Go -> Network. The neither the server name or Windows Network. All available shares will be listed.
For Mary you should see the finance directory. Work your way to it and create a text file add some text and save it.
Login as Bert our drudge. Try and edit the test file Mary created in the finance share. Bert will see the icon for the share but will not be able to open the folder. He does not have access that is what we setup.
Login as Fred the new Domain Controller. Try and edit the test file Mary created in the finance share. He should be able to do it. Create a file here and then see if May can edit that, she should be able to.
User Corner
If you installed this module it gives some possibly helpful functionality for users. This is a grandiosely named module that allows the user to change their password and setup and then access other email accounts they may have.
To access the User Corner just point your browser at https://lab-addc:8888. Make sure you have enabled a certificate for the service in Certificate Authority and then check on the dash board to see if the service is running.
Zentyal Config Backup AND Restore
Now we have covered setting up Zentyal as a Active Directory Domain Controller with users groups and have a number of PC’s connecting into it. It would be nice, if not essential, if we could backup the configuration. More importantly it is imperative that we can quickly restore our server in case of disaster. Unless the restore works and you have performed the restore yourself, any backup would be as much use as, say, the system corrupting Microsoft Backup from Small Business Server. I know from experience the MS backup is only of use filling up your hard disk and bricking your Server install when restored.
Backup the Zentyal Configuration
So hop over to System and then Import/Export Configuration. This page allows you to manually start a backup or restore. No screen print here as you should be able to work it out.
Scripted Backups
Behind the scenes this page calls a script with you can run yourself. This means you can schedule configuration backups. Allowing them to occur automatically.
To run the script from the command line:
sudo /usr/share/zentyal/make-backup --description "from command line"
Backup stored into file /var/lib/zentyal/conf//backups/2014-02-10-105208.tar
Refresh the Import/Export page and your newly created backup will appear. You may also like to write a script to purge old backups to avoid filling your file system.
To setup the schedule, write a simple shell script to call make-backup and drop it into /etc/cron.daily, /etc/cron.weekly or /etc/cron.monthly. This could for instance call the make-backup script and once that has finished it could move the backup to some on-line and off-site storage. It could also check the dates of old backups deleting those you no longer require.
Restoring the Configuration Backup
- Install a new Zentyal server.
- Start the Admin Web Portal.
- Reinstall all the modules you had loaded before.
- At the initial Network Configuration page click Skip for all remaining options.
- Open the page System -> Import/Export Configuration.
- Copy your backup file down to the new server.
- Browse to the downloaded file and restore it.
- SAVE CHANGES
- reboot.
- Pat self on back for having the foresight to use a Linux server based system.
It’s a little annoying having to reinstall everything by hand especially as there is a list of installed packages in the backup/restore file. I’m hoping the Zentyal guys sort that out 🙂
When I tried this myself, it took around 45 minutes from bare metal to fully restored! This is not possible with Microsoft Small Business Server, it takes longer to do the initial installation. That is without all the updates and multiple reboots 🙁
Footnote: Windows Backup in SBS is only of use to make you feel like you have a backup. Its main function is to use masses of resources generating huge files. Whilst I was doing some work for a small company, the hard drive on their SBS machine died. Yep it was not RAID 1, just a single disk. I was told with a smile that there was a frequent backup taken, using the totally useless Windows backup. To restore the totally useless backup from Windows Backup you install SBS, and then add exactly the same updates to it that were installed before. That assumes they are still available and do install. Then restore the totally useless Windows backup files. This took 28 hours! During which time the machine is not usable for anything. I say, totally useless, that is not entirely true, Windows backup does have one function, to take a bootable SBS hard disk and brick it! Please do not believe me, try a restore on SBS for yourself, ON A SPARE MACHINE, before it is too late. 🙂
That is the end of part two. Take a look at part three. In that we will be setting up email via the web and traditional clients.
Hey! Very nice Tutorial! I have one question: How do you backup the whole server? I can’t find useful information for this!
To backup a the whole server you can you an image with Clonezilla, or fwarchiver. There are many file backup applications for Linux just do a web search “backup linux servers. Personally I wrote my own.